My daughter has been home on Spring Break. Her first night in was a Mexican feast. After that it was the usual stuff. Yesterday she decided she wanted Red Velvet Cupcakes. You know what that means? It means I have got to pull out my Kitchenaid and begin creating, again. I had only made Red Velvet Cakes from boxes, never from scratch. So, I decided to go to the source...Hershey's website. I found a red velvet cake recipe that I could modify easily and decided to share it with all of you. For some reason my cupcakes fell, but tasted great. The cake I made, however, was great!
GLUTEN-FREE RED VELVET CAKE
1/2 cup butter, margarine or butter flavored Crisco, softened
1 1/2 cups sugar
2 eggs
1 tsp. vanilla extract
1 cup buttermilk or sour milk (see below if you don't have either)
1 Tbs. red food coloring
2 cups Hodgson's Mill Gluten Free Baking Flour
1/3 cup Hershey's cocoa
1 tsp. salt
1 1/2 tsp. baking soda
1 1/2 tsp. xanthan gum
1 Tbs. white vinegar
Preheat oven to 350 degrees. In a large mixing bowl, beat butter and sugar together. Add eggs and vanilla, beating well. In a seperate bowl, mix together buttermilk and food coloring. In another bowl, stir together baking flour, cocoa and xanthan gum. Add half of milk mixture to sugar mixture. Stirr well. Add half of flour mixture to sugar mixture. Stir well. Add remaining milk mixture, stirring well. Add remaining flour mixture, stiring well.
Spray a bundt pan with gluten free cooking spray.
Add vinegar and soda to batter, stirring well. Pour into bundt pan.
Bake for 30 minutes or until a wooden pick or knife inserted in middle comes out celan. Cool in pan on wire rack. Frost with desired frosting.
We use a bundt pan because you don't have to frost this. It is great without the frosting. My daughter doesn't like frosting so it gives it a nice look in the bundt pan.
I can't wait to share this cake with others and see how they like it!
NOTE: if you do not have buttermilk or sour milk, mix one tablespoon of white vinegar with enough milk to equal 1 cup.
Showing posts with label gluten free. Show all posts
Showing posts with label gluten free. Show all posts
Friday, March 15, 2013

Tuesday, December 25, 2012
Gluten Free Banana Bread
Here it is Christmas Day! Merry Christmas, everyone! Today was another busy day of cooking. As I began to make sure I had every available counter ready for my day long cooking spree, I noticed six medium sized bananas that were now officially past the "mmm, yummy" stage. So, I decided that I would start the day by making some wonderful banana bread. This is one thing that Bailey likes, but doesn't necessarily want all the time. However, I knew she would appreciate it today, so I set out to make a good banana bread that was both gluten free and very tasty. Success!!! So, here is my recipe.
Gluten Free Banana Bread
6 ripe bananas, medium sized, mashed
6 Tbs. butter, melted
1 cup sugar
2 eggs, beaten
2 tsp. vanilla
2 tsp. gluten free baking soda
2 pinches salt
2 1/4 cups Bob's Red Mill Gluten Free Baking Flour
Preheat oven to 350 degrees. With a wire whisk, mis together butter and bananas. Add sugar, egg, vanilla and salt. Sprinkle the baking soda over mixture and mix well. Add flour. Pour mixture into two medium glass loaf pans (spray the pans with gluten free coking spray). Bake for 55 minutes. Cool on wire rack.
You can also add pecans or walnuts to your batter. Since Bailey doesn't like either, we baked one loaf with and one loaf without. Everyone here loves it. We can't even tell it is gluten-free which in my book means it was a success. Enjoy!
Gluten Free Banana Bread
6 ripe bananas, medium sized, mashed
6 Tbs. butter, melted
1 cup sugar
2 eggs, beaten
2 tsp. vanilla
2 tsp. gluten free baking soda
2 pinches salt
2 1/4 cups Bob's Red Mill Gluten Free Baking Flour
Preheat oven to 350 degrees. With a wire whisk, mis together butter and bananas. Add sugar, egg, vanilla and salt. Sprinkle the baking soda over mixture and mix well. Add flour. Pour mixture into two medium glass loaf pans (spray the pans with gluten free coking spray). Bake for 55 minutes. Cool on wire rack.
You can also add pecans or walnuts to your batter. Since Bailey doesn't like either, we baked one loaf with and one loaf without. Everyone here loves it. We can't even tell it is gluten-free which in my book means it was a success. Enjoy!
Saturday, September 1, 2012
Gluten Free Cinnamon Toast Chex Mix
With the need to be gluten free, we discovered that we also have to be very aware of getting my daughter enough carbs because she is hypoglycemic. So, we were told that Chex Mix was a great way for her to get additional carbs when she needed it because of her sugar level. However, Chex Mix is not gluten free and the ingredients to make it at home are not all GF either. So today, I set out to make her some kind of mix that she would like. I know that you can buy cinnamon Chex, but it is different than what I have made. This tastes just like the cinnamon toast that I have made for my daughter all her life.
Cinnamon Toast Chex Mix
7 cups corn Chex
7 cups rice Chex
1 stick butter
1 cup honey
7 tablespoons ground cinnamon
Preheat oven to 250 degrees.
Melt butter. Add honey and cinnamon. Mix with a wire whisk. Heat in microwave for 1 minute. Mix well. Put cereal in large mixing bowl. Pour 1/4 of cinnamon mixture over cereal. Stir. Repeat three more times. Make sure cereal is well coated. Put in deep baking pan. Bake for 15 minutes. Stir. Repeat this process three more times. Increase oven temperature to 350 degrees. When you increase your temperature, set timer for 10 minutes. After 10 minutes, stir, return to oven and turn the oven off. After about thirty minutes, remove from oven and let cool. It will appear to be stuck together, but will come apart easily. Store in sealed baggies. I have a feeling, though, this won't last
 long around your gluten free home.
Cinnamon Toast Chex Mix
7 cups corn Chex
7 cups rice Chex
1 stick butter
1 cup honey
7 tablespoons ground cinnamon
Preheat oven to 250 degrees.
Melt butter. Add honey and cinnamon. Mix with a wire whisk. Heat in microwave for 1 minute. Mix well. Put cereal in large mixing bowl. Pour 1/4 of cinnamon mixture over cereal. Stir. Repeat three more times. Make sure cereal is well coated. Put in deep baking pan. Bake for 15 minutes. Stir. Repeat this process three more times. Increase oven temperature to 350 degrees. When you increase your temperature, set timer for 10 minutes. After 10 minutes, stir, return to oven and turn the oven off. After about thirty minutes, remove from oven and let cool. It will appear to be stuck together, but will come apart easily. Store in sealed baggies. I have a feeling, though, this won't last

Thursday, July 19, 2012
Gluten Free Cornbread
Every Southern cook knows that cornbread is an essential food to have on the table. It is also the base for good southern dressing, which is what I was needing to cook today. Don't expect a recipe for my dressing, though. I don't have one, because I just throw it all together. But in order to work my magic and make gluten free dressing, I first had to make a good gluten free cornbread. First try was ok, but too cake-like. Second try is much better, still not quite the same consistency as what I am accustomed, but it is pretty close. I am going to continue working on this in the hopes of hitting the exact same consistency we have had in the past. This looks and tastes like regular cornbread.
CORNBREAD
1 cup cornmeal
2/3 cup rice flour (I use my homemade version.)
1/3 cup gluten free baking flour
1/2 tsp. xanthan gum
4 tsp. baking powder
1/2 tsp. salt
1 cup buttermilk
1 egg
1/3 cup vegetable oil
1/2 cup skim milk
Preheat oven to 425 degrees. If using a cast iron skillet to bake your cornbread, spray it with non-stick gluten free cooking spray and place in oven to preheat as well.
Mix together all dry ingredient. Add milks, egg, and oil. Pour batter into preheated cast iron skillet. (regular baking pans do not need to be preheated.) Bake for 20 - 25 minutes until golden brown. Turn out on plate with a knife underneath to prevent it from sticking.
Enjoy Gluten-free southern cooks!
CORNBREAD
1 cup cornmeal
2/3 cup rice flour (I use my homemade version.)
1/3 cup gluten free baking flour
1/2 tsp. xanthan gum
4 tsp. baking powder
1/2 tsp. salt
1 cup buttermilk
1 egg
1/3 cup vegetable oil
1/2 cup skim milk
Preheat oven to 425 degrees. If using a cast iron skillet to bake your cornbread, spray it with non-stick gluten free cooking spray and place in oven to preheat as well.
Mix together all dry ingredient. Add milks, egg, and oil. Pour batter into preheated cast iron skillet. (regular baking pans do not need to be preheated.) Bake for 20 - 25 minutes until golden brown. Turn out on plate with a knife underneath to prevent it from sticking.
Enjoy Gluten-free southern cooks!
Thursday, July 5, 2012
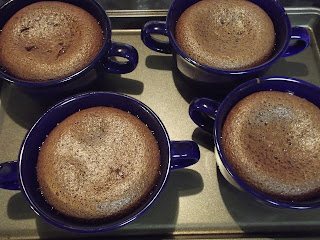
Gluten-Free Chocolate Melting Cake - Delicious!
I guess at this point it is obvious that I have had the day off since this is the third post of the day. However, this was one post that I just couldn't wait to share. I have just modified a recipe for Chocolate Melting Cake and added my own little twist to it. (We like dark chocolate in our house, so that is my twist.)
We have been on Carnival for two different cruises now. The first time, Bailey was not gluten intolerant. This last time, however, she was. The one disappointment she was facing was not being able to have any of their chocolate melting cake. What is really great about Carnival and other cruise lines is that they have anticipate dietary needs. They had a gluten-free chocolate melting cake. Needless to say, it was divine. So, I began my quest to find an equivalent recipe and modify it. I have done just that. So, if you are looking for a great dessert, especially a gluten-free one, this is perfect! (I will include directions to modify it to a non-gluten free recipe.) I hope you try it and enjoy it as much as we did.
Gluten-Free Chocolate Melting Cake
7 large eggs
1/2 cup sugar
8 oz. dark chocolate chips
1 cup butter (2 sticks)
1/2 cup gluten-free baking flour (1/2 cup all purpose flour for those who can have gluten)
1/4 tsp. guar gum (this is only needed for the gluten-free version)
Preheat oven to 375 degrees.
Melt chocolate chips and butter together. Mix to blend. Set aside to cool.
While chocolate mixture is cooling, whisk 4 eggs together with the sugar. Add flour and guar gum. Whisk until smooth. Add remaining eggs. Whisk until smooth. Add cooled chocolate mixture.
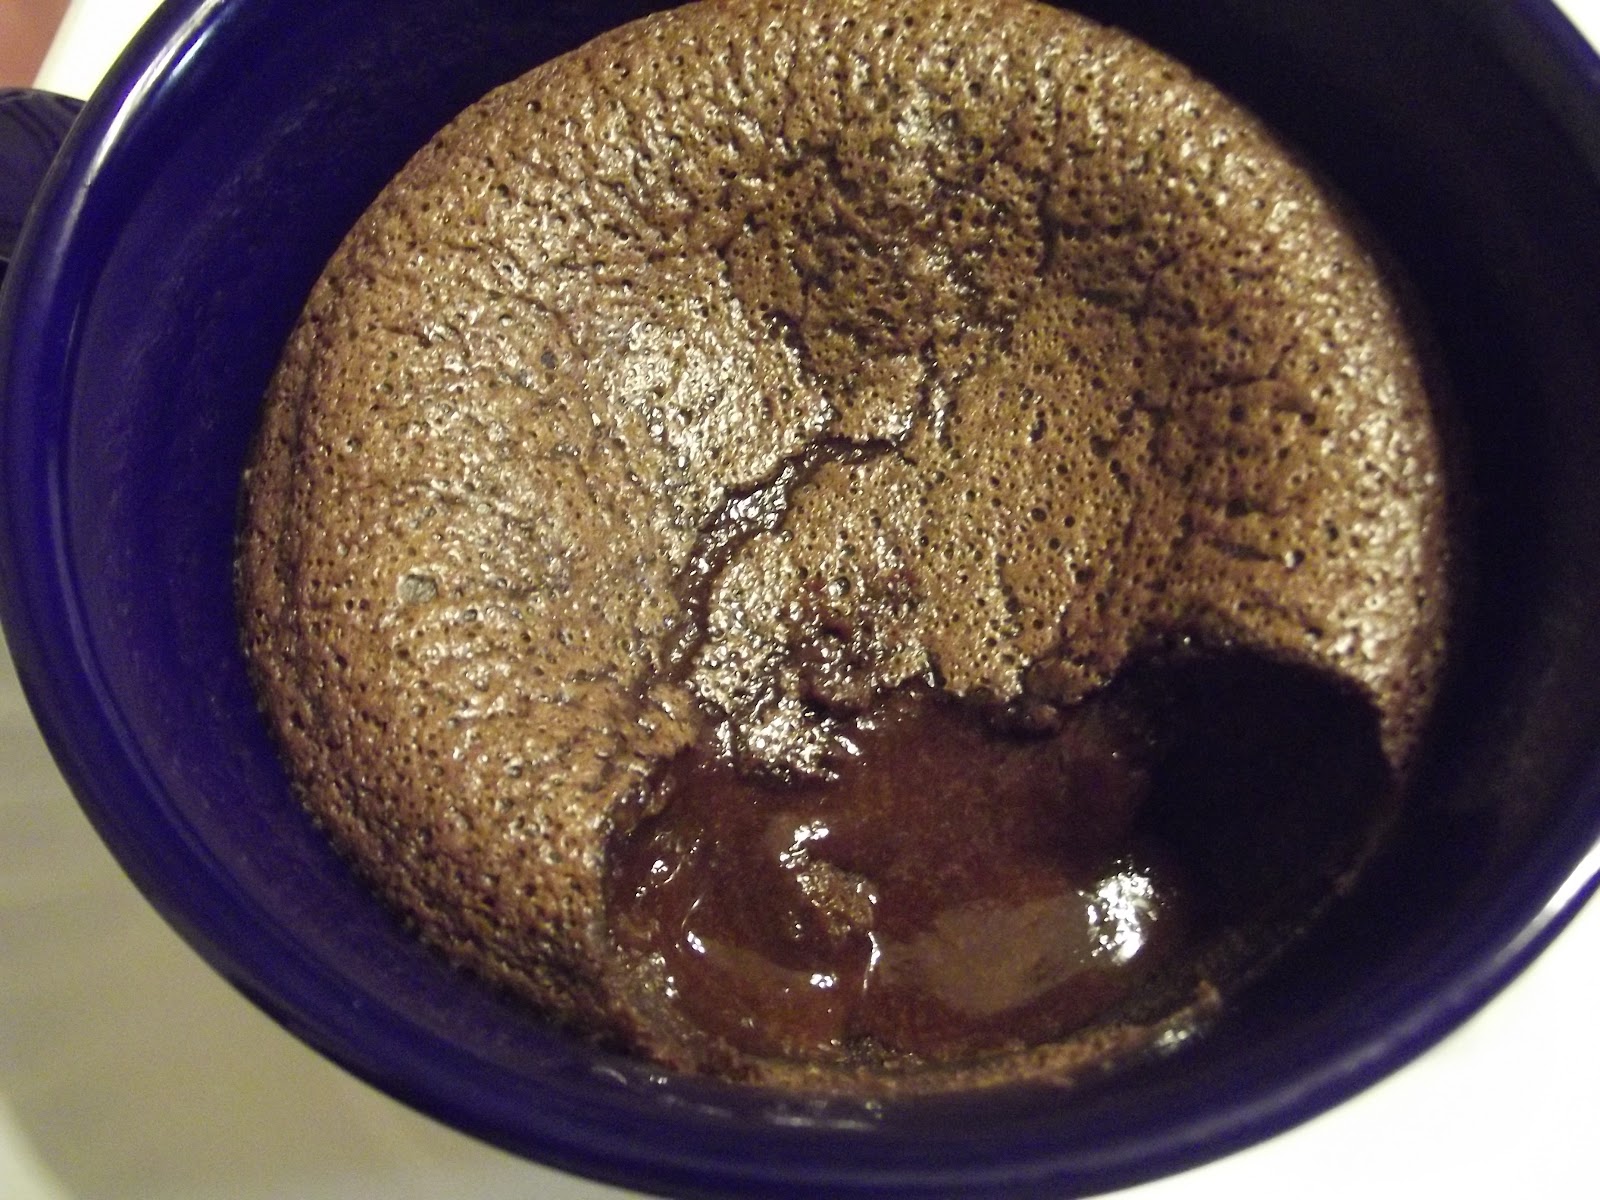
Coat ramekins or individual baking dishes with a very light coat of oil. (I used olive oil.) Divide mixture between baking dishes. Bake for 15 - 20 minutes until it looks done. Baking time will depend upon the size of your baking dishes. Ours are large, so it actually took 22 minutes. Remove from oven. The chocolate inside will be melted. Serve warm and enjoy.
You can dust this with powdered sugar and/or serve with vanilla ice cream as they do on the cruise ships.


We have been on Carnival for two different cruises now. The first time, Bailey was not gluten intolerant. This last time, however, she was. The one disappointment she was facing was not being able to have any of their chocolate melting cake. What is really great about Carnival and other cruise lines is that they have anticipate dietary needs. They had a gluten-free chocolate melting cake. Needless to say, it was divine. So, I began my quest to find an equivalent recipe and modify it. I have done just that. So, if you are looking for a great dessert, especially a gluten-free one, this is perfect! (I will include directions to modify it to a non-gluten free recipe.) I hope you try it and enjoy it as much as we did.
Gluten-Free Chocolate Melting Cake
7 large eggs
1/2 cup sugar
8 oz. dark chocolate chips
1 cup butter (2 sticks)
1/2 cup gluten-free baking flour (1/2 cup all purpose flour for those who can have gluten)
1/4 tsp. guar gum (this is only needed for the gluten-free version)
Preheat oven to 375 degrees.
Melt chocolate chips and butter together. Mix to blend. Set aside to cool.
While chocolate mixture is cooling, whisk 4 eggs together with the sugar. Add flour and guar gum. Whisk until smooth. Add remaining eggs. Whisk until smooth. Add cooled chocolate mixture.
Coat ramekins or individual baking dishes with a very light coat of oil. (I used olive oil.) Divide mixture between baking dishes. Bake for 15 - 20 minutes until it looks done. Baking time will depend upon the size of your baking dishes. Ours are large, so it actually took 22 minutes. Remove from oven. The chocolate inside will be melted. Serve warm and enjoy.
You can dust this with powdered sugar and/or serve with vanilla ice cream as they do on the cruise ships.


Best Gluten Free Breads
My daughter loves bread, especially homemade bread. Bread has been the most difficult thing to be able to find for her. Unfortunately, the bread she has found that she loved was on our Carnival Cruise. (Thank you, Carnival, for having gluten free options for your cruisers!)
I have gone through all kinds of bread mixes. I was going to make my own but hadn't ventured into it because I still needed to purchase guar gum or xantham gum, both of which I now have. However, after all the mixes and purchasing a variety of gluten free breads from the freezer section at two different stores, we have finally found a bread mix for the bread machine that is fantastic. It is so good that my husband and I love it as well. You can't even tell it is gluten free.
Pamela's brand is by far the best mix we have found. Sure, it cost $5.99 a bag and is not even size loaf like most people get from the bread section of the grocery store, but it is fantastic. Who would have thought that something gluten free would taste so fantastic. It can be baked in the bread machine or in the oven. The directions suggestion is to bake it at a medium crust. The only problem we found when following the directions is that the top crust looks great but the sides and bottom seem to be overdone. I am about to make another loaf today and will set it to a light crust. I think this will take care of that problem. But even if it doesn't, the reality is this: we have finally found a bread mix for the bread machine that is wonderful.
For those of you who don't want to make your own bread, there are numerous options out there for you. They can be found in the freezer section of some grocery stores (I went to Kroger) and health food stores. You will pay anywhere between $4.99 and $8.99 for the convenience. Of all of the brands we have tried, my daughter likes Udi's the best. Udi's has the best flavor and comes the closest to tasting like the regular gluten-filled bread that my daughter can't have. We have even had one bread from a local gluten-free home cottage bakery which my daughter didn't like because it didn't taste like bread and had a sponge-cake consistency.
There is one big catch with gluten-free bread, which I did find out from the owners of the gluten-free bakery. Bread that is gluten free really needs to be consumed within a day or two. Otherwise, it needs to be frozen. Putting it in the refrigerator does not actually extend the life of the bread. Instead, it dries it out. Have no fear though, there is a use for that bread or the bread that is about to be too old to keep. Croutons! I am used to making my own croutons from bread that is going stale and figured if I do it with regular bread, I can do it with gluten-free bread as well. I was right. I will close this post with my gluten-free crouton recipe.
Gluten-Free Croutons
slices of gluten-free bread
olive oil
garlic salt, to taste
Italian seasoning, to taste
Lay out gluten-free bread slices on baking sheet. Using either a spray bottle with olive oil (this is out new non-stick cooking spray) or a pastry brush, put a very light layer of olive oil on bread slices. Sprinkle with garlic salt and italian seasoning. Turn bread slices over and repeat process. Place on the bottom rack of oven under the broiler for 3 minutes. Turn and return to oven for another three minutes. Remove from oven. Cut into squares and place them back on the baking sheet. Change oven temperature to 275 degrees and return croutons to oven for 20 minutes. You can turn the croutons over during this process, if you like. Turn off oven and forget about them. This will give them time to finish drying out. (This entire process may sound odd, but gluten free bread can be very fragile. It is easier to get them lightly toasted and then cut them followed by the drying process.)
You may need to adjust the time based upon the type of bread you are using. Preslided bread browns slower than the sponge-cake type consistency. If using bread that you can slice yourself, you can have thinner slices which brown easier. Make sure you adjust your time for thinner slices when they are under the broiler.
You can actually use any kind of spice on these. I haven't tried yet, but I am guessing that you could even use some powdered ranch dressing mix to make ranch flavored croutons.
The great thing about these croutons, other than being gluten-free, is that you can't tell they are gluten-free.
I have gone through all kinds of bread mixes. I was going to make my own but hadn't ventured into it because I still needed to purchase guar gum or xantham gum, both of which I now have. However, after all the mixes and purchasing a variety of gluten free breads from the freezer section at two different stores, we have finally found a bread mix for the bread machine that is fantastic. It is so good that my husband and I love it as well. You can't even tell it is gluten free.
Pamela's brand is by far the best mix we have found. Sure, it cost $5.99 a bag and is not even size loaf like most people get from the bread section of the grocery store, but it is fantastic. Who would have thought that something gluten free would taste so fantastic. It can be baked in the bread machine or in the oven. The directions suggestion is to bake it at a medium crust. The only problem we found when following the directions is that the top crust looks great but the sides and bottom seem to be overdone. I am about to make another loaf today and will set it to a light crust. I think this will take care of that problem. But even if it doesn't, the reality is this: we have finally found a bread mix for the bread machine that is wonderful.
For those of you who don't want to make your own bread, there are numerous options out there for you. They can be found in the freezer section of some grocery stores (I went to Kroger) and health food stores. You will pay anywhere between $4.99 and $8.99 for the convenience. Of all of the brands we have tried, my daughter likes Udi's the best. Udi's has the best flavor and comes the closest to tasting like the regular gluten-filled bread that my daughter can't have. We have even had one bread from a local gluten-free home cottage bakery which my daughter didn't like because it didn't taste like bread and had a sponge-cake consistency.
There is one big catch with gluten-free bread, which I did find out from the owners of the gluten-free bakery. Bread that is gluten free really needs to be consumed within a day or two. Otherwise, it needs to be frozen. Putting it in the refrigerator does not actually extend the life of the bread. Instead, it dries it out. Have no fear though, there is a use for that bread or the bread that is about to be too old to keep. Croutons! I am used to making my own croutons from bread that is going stale and figured if I do it with regular bread, I can do it with gluten-free bread as well. I was right. I will close this post with my gluten-free crouton recipe.
Gluten-Free Croutons
slices of gluten-free bread
olive oil
garlic salt, to taste
Italian seasoning, to taste
Lay out gluten-free bread slices on baking sheet. Using either a spray bottle with olive oil (this is out new non-stick cooking spray) or a pastry brush, put a very light layer of olive oil on bread slices. Sprinkle with garlic salt and italian seasoning. Turn bread slices over and repeat process. Place on the bottom rack of oven under the broiler for 3 minutes. Turn and return to oven for another three minutes. Remove from oven. Cut into squares and place them back on the baking sheet. Change oven temperature to 275 degrees and return croutons to oven for 20 minutes. You can turn the croutons over during this process, if you like. Turn off oven and forget about them. This will give them time to finish drying out. (This entire process may sound odd, but gluten free bread can be very fragile. It is easier to get them lightly toasted and then cut them followed by the drying process.)
You may need to adjust the time based upon the type of bread you are using. Preslided bread browns slower than the sponge-cake type consistency. If using bread that you can slice yourself, you can have thinner slices which brown easier. Make sure you adjust your time for thinner slices when they are under the broiler.
You can actually use any kind of spice on these. I haven't tried yet, but I am guessing that you could even use some powdered ranch dressing mix to make ranch flavored croutons.
The great thing about these croutons, other than being gluten-free, is that you can't tell they are gluten-free.
Gluten Free Rice Flour - from scratch
My daughter, who is 18, was diagnosed with Celiac Disease about 3-4 months ago. This means that all of my cooking had to change. Thank goodness I am someone who loves to cook, can follow a recipe, and can create something out of nothing. But, it was still a difficult thing to think about since I am also a southern cook. (thank goodness I don't make fried chicken.)
Over the last few months, I have Searched the Internet, read books, and experimented. While I am not an expert, I have been told that I should create a gluten free food blog. I am doing that because the one thing I seem to find is that ate majority of gluten free recipes do not even come close to the taste of the original food with gluten in it. So, my goal is to share some of the tricks I have found and recipes I have modified in order to get the flavor closest to the original.
For this first blog, I want to share a trick with you about making your own rice flour. I watched a video online and followed the directions as closely as possible by using my blender because I didn't have the $200 food processor or grain mill that the woman in the video had. I ended up with some pretty decent brown rice flour. For me, this is the flour that I want to use as the main flour whenever I am making anything breaded. The problem, my blender wasn't quite what I needed. The woman in the video took about 45 - 60 minutes to make the flour. It took longer with the blender. Next I tried a mini chopper. Ultimate failure.
I finally decided I was going to get the grain mill attachment for my kitchenaid mixer. It was going to cost $99.00. Lowes online said that it was in stock in our local store. It wasn't. Instead, what they had is nice Mr. Coffee coffee grinder for $29.95. When I got home, I tried it. I had it figured out quickly. It works. Set it to fine and only fill it up halfway. You can sift the flour after grinding to remove any large pieces that might have gotten through (something even the video lady with the fancy machine had to do). I use this mostly as breading flour. But I still kept one step from the woman in the video, I sifted the flour. It was pretty much just like when I used the blender and much faster. Thank you Mr. Coffee!
Some of my next blogs will have breads, crackers, cookies, corn dogs, Mac and cheese, and more!
Happy Gluten Free Living!
Over the last few months, I have Searched the Internet, read books, and experimented. While I am not an expert, I have been told that I should create a gluten free food blog. I am doing that because the one thing I seem to find is that ate majority of gluten free recipes do not even come close to the taste of the original food with gluten in it. So, my goal is to share some of the tricks I have found and recipes I have modified in order to get the flavor closest to the original.
For this first blog, I want to share a trick with you about making your own rice flour. I watched a video online and followed the directions as closely as possible by using my blender because I didn't have the $200 food processor or grain mill that the woman in the video had. I ended up with some pretty decent brown rice flour. For me, this is the flour that I want to use as the main flour whenever I am making anything breaded. The problem, my blender wasn't quite what I needed. The woman in the video took about 45 - 60 minutes to make the flour. It took longer with the blender. Next I tried a mini chopper. Ultimate failure.
I finally decided I was going to get the grain mill attachment for my kitchenaid mixer. It was going to cost $99.00. Lowes online said that it was in stock in our local store. It wasn't. Instead, what they had is nice Mr. Coffee coffee grinder for $29.95. When I got home, I tried it. I had it figured out quickly. It works. Set it to fine and only fill it up halfway. You can sift the flour after grinding to remove any large pieces that might have gotten through (something even the video lady with the fancy machine had to do). I use this mostly as breading flour. But I still kept one step from the woman in the video, I sifted the flour. It was pretty much just like when I used the blender and much faster. Thank you Mr. Coffee!
Some of my next blogs will have breads, crackers, cookies, corn dogs, Mac and cheese, and more!
Happy Gluten Free Living!
Subscribe to:
Posts (Atom)